
Tying a Ghost Caddis Pupa

Tying a Ghost Caddis Pupa with Thread Shredder Dave Jennings
Materials for Tying a Ghost Caddis
Hi everyone Dave here at East Rosebud Fly and Tackle in Billings, Montana, tis the season spring is here, bugs are starting to hatch, today I'm going to tie for you a different Cates pupa. Now remember in the Caddis life cycle, the pupa is the most vulnerable stage, so it is the type of the stage that you should be fishing the most often, the pupa raise rise from the bottom up to the top, sometimes they stall, they go back down to come back up, sometimes they hang up under the surface film, and this whole time during view of the fish, and this applies to both River Caddis and lake and pond caddis.
Watch Here on East Rosebud Fly and Tackle
Let's Start Tying
Hook: Standard Nymph Hook Size 12
Thread: 8/0 Veevus brown
Dubbing: SLF Squirrel
Wax: Overton's Wonder wax
Vail: Polar Fibre
Antennae: Ringneck Pheasant tail fibers
Legs: Hungarian Partridge
Set up your materials and tie along with Dave
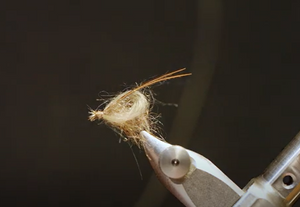
The pupa is a very, very important life pattern to be fishing, I'm gonna be tying... It's called a Ghost pupa. This is kind of a take-off from a pattern from John Goddard, who is a British fly tyer, a noted author fisherman. It's a little different than the sparkle pupa, the Gary LaFontain developed, it's a little easier to tie, but it's very much in the same vein and that we have a body, we have... And I'll show you how the sheath changes once it's wet and antenna and some beard tackles for legs, very easy pattern to tie.
I'm going to start off with just a standard M hook, this is a size 12, it's one extra strong 1X long, and you can easily tie these down to smaller sizes. I'm using Veevus 8/0 Brown thread. I like the Veevus thread for this because I'm going to be using touch dubbing and I need a thread that will hold wax well, and will also hold dubbing well.
So we wanna start about an eye length and a half behind the eye to leave a little room.
Just enough to capture the thread. Now, I'm gonna be using a product that Alan & Gretchen Beatty provide Teatro dubbing. It's a touch dubbing, they used to make this for Gary LaFontaine when he was still alive, so very easy is a synthetic mix. Very fine. And for touch dubbing, all you need is a tacky dubbing wax They make theirs. We carry overtons. Hairline also has a sticky dubbing wax, all you have to do then make sure you don't have a lot of wax exposed out of the tube, this is really a little too much because it then tends to clog up on the thread, so I just want a little bit of wax on there, and.
Then all you have to do is get your dubbing and just kind of just roll it down there on the thread, keep it thin... That's the key to touch... Dubbing is to keep it thin... I also like to dub in two directions, I'll be dubbing backwards and in dubbing back forwards, that helps to trap that dub, and I'm going to spin the thread a little bit, that also helps capture it, so just like wrapping thread were going to wrap it, not exactly touching wraps but fairly close, we wanna build up a conical shape body, make sure we're all the way down to the end of the hook Shank, and then reverse the process. I wanna come within about an eye of the end of the hook, a little bit more dubbing here, and this dubbing is available in a variety of colors, but you can really use any dubbing, natural or synthetic, that's fine enough that will allow you to use this as we come forward, I'm gonna just make the wraps a little bit closer, just to taper this a little bit, but the key again is don't over do the wax and keep the dubbing very, very sparse.
Alright, perfect. We'll go ahead and finish our thread to find handy eye and then back... Now, what I got from John Goddards pattern is really a material that I would never think of to use for nymph, and this is called Polar fiber. Do you look at this and you think, streamer, but this is actually a fantastic material for this particular application, it's silly fine, it comes in a lot of different colors and it's much easier to tie in, then with the sparkle pupa, you have two bunches of Antron that you have to then come out... Fold over and do all of that. It takes very little of this is going to cut some off here, it does have a bit of under fur to it. I'm just going to clean that out a little bit, and just like on any material, this needs to be... Translucent is as close as you can get to transparent, so don't overdo the amount that you use, so I'm just going to square off, and that was closest to the mat on that, tie this, a couple of wraps here, and I'm simply going to bring this around the fly on the other side, he put fairly tight, but again, this is the veil, A or two to secure it, it really changes significantly when it's wet, and I'll show you that here at the end...
Alright, for antenna, simply going to use a couple of ringneck pheasant tail fibers. Some of these pupa have antenna that are as much as two and a half times the length of the body, some are shorter, but I think it adds kind of an elegant touch to the fly on loose wrap, secure it. Make sure it's centered and tie it down. Pattern also calls for revered, which is simply some fibers underneath to represent the legs. People seem to have a difficult time tying that, of course, if you're tying it underneath it can be difficult, but I'm going to show you a method that makes it much easier regardless of whether you have a rotary capable Vice or whether you wanna tie it in just like it is, I'm just going to use a common partridge feather, and I say Just Hungarian partridge. I'm going to stay with a brown feather since we have tan and brown here, clean off the bottom of the feather, have it by the tip and express the Hackle. What we're doing here initially is determining how long we want this bear to be, so typically from about behind the eye to about the hook point, then.
Then I cut the tip out.
And now we determine the thickness of the beard by how much we retain on the Quill I don't want a lot of fibers on this, I think that's more than enough. And strip those away. So this is what we have, just a V-shape is the foe method been around a long time. Simply tie it in with a couple of not real tight wraps like that, and then pull the coil until you get the feather positioned where you want it centered under the hook and the hackle to about the hook point like that. Very easy. A couple of raps to secure it, trim it off. Then we'll whip finish. So that's what it looks like in the dry form, but when it gets wet, and this is where the difference really comes in, is this...
See how the water collapses, that polar fiber, the sheath becomes almost invisible, and it looks very much like a real caddis pupa, as you saw, it only took a couple of minutes to tie, it's very, very quick, very easy to adjust to different colors, different hook sizes you could even use a scud, if that's what you prefer. You can weight it with some wire, you could put a bead on it, a lot of options here.
So give it a try. Polar fibers is a remarkable material, I think another fiber that might do just about the same, although I haven't tried it, is floral fiber that has much of the same consistency.
Thanks for joining in. Any questions or comments? Please let us know if I'll see you next time.
Fly Fishing Gear to Create the Perfect Trip on the Water
Besides the right fly on the water the right gear such as Simms Flyweight Stockingfoot Wader and a pair of Korkers River Ops Wading Boots. You defiantly need to get on the river with the perfect Sage Fly Rod and Abel Reel to enhance the experience of fighting and landing that trophy trout.
- East Rosebud Fly and Tackle

Comments 0