
Tying a Clouser Minnow

Tying a Clouser Minnow with Thread Shredder John Wood
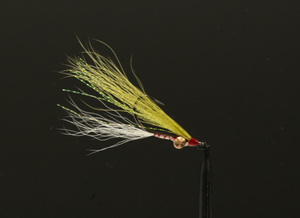
Materials for a Clouser Minnow
Hey everybody, this is John Wood, and I am coming to you from East Rosebud Fly and Tackle in beautiful Billings, Montana. In this video, I am gonna do for you a Clouser minnow, I'm gonna try to tie it the way Bob Clouser are intended for this fly to be tied, because the fly is good for everything from in small sizes, bluegills all the way up to anything you can fish for in the salt water and everything in between, I have started tying these on to saltwater hooks, and the hook that I'm really loving right now is this Umpqua X-Seris SS-420. We're gonna do this one on the size two. The threat I'm gonna be using is a Uni 6/0 red, I really like that 6/0, it's big enough to do what we need to do without building up too much bulk, the eyes will be a medium brass eye, and I like these brass eye as opposed to painted lead eye, is because the Clouser tends to bounce around on a lot of debris and the eyes are very exposed and the paint will just chip right off, so we put that paint on there and then it just chips off for the Belly.
We're gonna be using the white along the edge of a natural Northern Bucktail, and I'm gonna put all the flash in the middle, which is olive a Crystal Flash that will go on before we put the wing on, which will be a light olive bucktail. And again, we'll use the pair from along the outside age of the buckets, Let's get started.
Watch Here on East Rosebud Fly and Tackle
Let's Start Tying
Set up your materials and tie along with John
Let's Get started tying this thing... Now, as you can see, I hold this up here, this is a very sparsely tied fly, and that's where some of the issues come with this thing and not getting it tie just right, the tendency, is to throw a lot of materials on there, 'cause you want a lot of ball but that's not how the fly was designed, if you put too much hair on there, especially on the belly side, it's gonna flip it and never write like this, and it's gonna do that. The fly is intended to swim like this through the water, so we'll get the hook, I'm gonna set it in here... Now, one of the things I see when beginning tyers are trying to learn how to tie this thing, set the eyes really, really close to the eye of the hook, what we really wanna do is you wanna take the shank right where the Ben starts, and we wanna divide that into thirds, and I'm gonna come one third back on the shank and build a big thread bump. And this is gonna be a pretty good sized bump, now that's gonna set exactly where my eyes are gonna be located, and what I'm gonna do is take these eyes and with my thread in front of the bump, I'm gonna loop this over the center of the eye and then drop it behind the bump, and when I do that, that's gonna pull it right up against that thread bump, now I wanna get three or four wraps one way on the eyes, and you don't see it, start to tell titled, you can see it spinning that way it's tilted.
Now I'm gonna go the other way and get the same amount of wraps, and that will even those eyes up, and this is the point where I wanna check and make sure their level with the eye of the hook, because now I'm gonna really lock these down when we start and make quite a few wraps one way, then make quite a few wraps the other way, make sure they're straight, and now I'm gonna loop between the eyes and the hook Shank several times, and what that does is that squeezes or RAPS in and then repeat the other process, and I do this several times, what that's gonna do that's gonna lock those eyes down so tightly that when I grab them and try to move them around, they should not move at all, and those are very tight. Right now, we're gonna bring the thread all the way up here to right behind the eye, and then bring it half way back between the Barbell eyes and the hook eye, then we're gonna put our belly on, and like I said, this is just a nice Northern buck tail but there's a couple of things you wanna know about this buck tail, the base of the buck tail, the hair is very hollow, it flares like the hair off the back or the body of the deer, if you put this on here and then you tighten it down, it's gonna flare out like this as get towards the end of the buck tail, the hair becomes solid.
So basically, for tying Clousers, what I wanna do is Disregard at least that bottom third of the tail, this... I don't wanna use hair from that portion of the tail, I'm gonna come up here about halfway in, and I'm gonna grab a very small clump of the white, and then snip it off. Again, I wanna emphasize the fact that this is a very sparse Fly, I don't have a lot of hair there, now, to start off, I'm gonna pull the extra long ones out and get them out of the way, and then I'm gonna grab it about an inch from the end and pull all of those hairs out of the base, all the short hairs, and what I'm gonna be left with is about 20, 25 at the most on a fly in the size, this is a size two I don't want... A lot of bulk. I'm gonna take these the shorter and pull them out a little bit, I don't even it, I don't wanna stack it, you don't want the end completely even, but you don't want it look in two, Scraggly won't have a little bit of bulk towards it in, in...
I like the hair to be about twice the length of the fly on the hook, so this one is gonna be about a little over two inches long, if I measure the hair the link that I want it, cut it, I want it cut nice and square. Now, here's a little trick to tie in the end as I've collected my hair and groomed it out, my thread has flattened out, all the twist just come out of it, and that's gonna help me if I've got a lot of twists that's gonna want to go backwards as I put that first wrap on there, but with the thread flattened, if your thread is still spun, spin your mom and counter clockwise and that'll flatten your thread out, but the end rite down behind the eye of the hook, and then make one very loose wrap. And don't pull down as you come down with this thread tension as you come up, and what that's gonna do, it's gonna pull that thread of the hair right up on top of the hook, and then I'm just gonna wrap forward, I kind of rotate it a little bit, so I'm gonna pull that back and then cover that up and get it bound down, and if you'll notice I'm not going all the way back to the eyes, I stop short, low, past halfway, and then just loop back behind the eyes, and as you pull down on the thread, pull up on the buck tail and that stacks it right up on top of the hook, which will be the bottom when we're done, and then I'm gonna spiral them back and tie that off right at the bend.
We've got kind of a candy cane spiral, and I'm gonna come back and make a Chris cross. And if you wanna strengthen it a little bit more, which is not absolutely necessary, 'cause we're gonna coat, this one, we're done, you can make another round and you were... And you'll notice there's no hair on this side of the hook Shank, it's all on what is gonna be the belly of the fly, once I get my thread back up here, I'm gonna jump it all the way up right behind the eye of the hook. Now, for a long time, I would turn this upside down in my vice or the hook point, but I finally figured out that with this style of Vice, the Jaws actually helped me tie the fly a little more correctly because it forces everything the way it's supposed to be... 'cause we want this why to create a V. So by tying against those jaws, that's gonna help us create that, now I'm gonna put some flash in here and I want it... I don't want a whole lot. So I'm just gonna use four strands of the Crystal Flash and take it and Loop it behind the thread, even it up, and then set it right up on top of the fly, make one loop in front, and then while holding up on it in a spiral back, to my tie-off point of the belly hair, make another wrap there, and now I'm gonna go behind it three times, and what that's done is it's gonna take that Crystal Flash and hold it up between the hair that makes the back and the belly.
So that flash is gonna in end up, as you can see, right in the middle, it keeps you propped up there, now we're gonna put the back in and I wanna bring this right to the center of my tie end point, and again, I wanna let that thread unwrap while it hangs there, so that it will be nice and flat, and you can see this buck tail I've cut it in half, it was the tip over here, and this one is a little fluffy or so I'm getting more out towards the end, and the way you can tell if the hair is... How is to squeeze on it and a spongy is hollow, and if you squeeze on it and that's not so spongy, then it's more solid. So again, I don't wanna use a lot of bulk, I want this fly to look pretty sparse, so... Here's the clump that I've got, it looks fairly big right now, but again, we're gonna clean a bunch of it out, I'm gonna take the longest ones out, so they have got a fairly even... And it's not too scraggy, but it's not like we've stacked it, and again, grab it about an inch from the end and brush out all the shorter hairs.
Till I get the bulk I want, and then what I'm looking for here is about twice the bulk of what I had in the belly... Again, no, it's not a whole lot. It's a lot less than you would think. This is probably 35 to 40 hairs at most, and I'm gonna measure it so that it's just a hair longer than the belly hair, because when we tilt it up, it's gonna make it appear a little bit shorter, and again, cut it to length a nice square in and this is the thing that leaving the hook in the way it was originally set, it really helps you because you want to put that hair down at a sharp angle when you put it on there, and that's what's gonna keep it clump together. As you tie it in again, very, very loosely, and as you come around on that wrap, pull your hair back to where it's all behind eye and then pull right up and keep it pinched very tightly, and then work your way right up to the eye. Now I'm gonna, as I keep that Pinched, I'm just gonna cover everything in front of that tie endpoint, and as you can see by pinching that hair like that, it's not flaring out and it stayed right up on top of the hook Shank. Get my little whip finisher here.
Whip finished this thing. And then one last step before we toughen up this fly, I pull that up there and grabbed this Crystal Flash pull it up, make sure you're not getting any hairs in there, and then list had shorter than the olive on top. Now, one of the problems with the Clouser are, If you don't reinforce it, is that this thread is very, very susceptible to fish teeth as well as right here between the eyes. It's very, very delicate. So I'm gonna use Solarez, thin hard formula. And this is something that when they first started timing the thing back in the old days, I had to use epoxy, and it was a little trickier to work with, luckily, we've got the good stuff. Now, I'm gonna put this a little bit on the back and then take my bodkin, and I wanna make sure that it coats the whole back side of that and then bring that drop up over the hair between the eyes, and then I'm gonna drop it just a tad off the back of those rear thread wraps, and once I cure this, you'll see why. Rotate this back and forth, and you could see when I let go of that, how contain this hair is for the belly, it's a nice type clump.
Now, give that another shot. I make sure I've got it everywhere. And they don't wanna do the front, and we're kind of gonna do the same thing that we did with the belly and containing that hair, you could give it the exact shape that we want, it may look like I'm putting a lot on here, but this is maybe three drops on, just kind of coaxing, not drops out of the bottle as I go around, and I wanna make sure it's where I want it, pull that hair up there. You see, I'm getting it all clumped together and then... Shoot that with my light. And again, you can see it just kind of contained everything and keep that hair in a clump and keeps it from splaying out quite so much. I just wanna make sure I've got that cured. Really, really good. And there you have it, a Clouser Minnow, you could see that it's in shape of a V, and it gives it a flat profile, and when you pull it through the water that hair is gonna collapse down and open back up, and you can also see that the Crystal Flash, because of those loops under the thread is held up in between as opposed to just laying there on the hook so tie you few up and see how they do for you.
- East Rosebud Fly and Tackle

Comments 0