
Tying a Goggle Eyed Damsel

Tying a Goggle Eyed Damsel with Thread Shredder Dave Jennings
Materials for Tying a Goggle Eyed Damsel
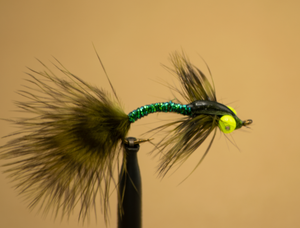
However, one Dave here, East Rosebud Fly and Tackle in Billings, Montana. Good morning, it's June, which means it's a damsel fly season. How I developed the pattern, I wanna call it a goggle eyed damsel fly, this is a light damsel meant to be fish right underneath the surface, to be chain eyes and a little bit of a epoxy on the wing case. Give it just a little bit of weight. So when you quit retrieving, it slowly dies when you start treating, it picks back up, and I'm using the Daiichi swimming larva hook, and that's going to help with the motion on this particular fly... Let's see, thread-wise, I'm just gonna be using some Uni 6/0 Olive little strip of 0.25 lead weight that's just to help make sure at this damsel floats in the right direction. And then for the tail and the hackle, I'm gonna be using this Whiting soft hackle with the Chickabou on it, is actually a tremendous value, there's a ton of feathers on this, you can buy the Chickabou separately, but then you don't get all the soft tackle in here, so this fly is dedicated to Dr. Whiting and his products and his Chickabou soft hackle, the body is just Midge Diamond Braid just to wrap on that.
And then for the thorax, I'm using a strip of bug skin, this is actually a goat leather thin very fine Chuck for Mike's developed this, and this was a paralyzed Olive, but I found out it really doesn't make a lot of difference. I'm going to tie this in so that I actually bring the dull side up, and when I hit it with the Solarez thick that really darkens that leather and gives me a darker one case.
Watch Here on East Rosebud Fly and Tackle
Let's Start Tying
Hook: Daiichi 1770 Swimming Nymph size 6
Thread: Olive 6/0 uni
Eye: Chartreuse Bead Chain
Tail: Whiting Farms Grizzly Chickabou Dyed Olive
Lead: 0.25
Body: Diamond Braid Green
Hackle: Whiting Farms Bamha Grizzly Dyed Olive
Thorax: Bug skinFinish: Solarez Thick
Set up your Materials and Tie Along with Dave
So we'll start with the uni thread in Olive. Get a bit of a thread base here. I wanna make sure when we tie in these fluorescent bead chain eyes, we did leave enough room to bring this bug skin, thorax or the wind case over the top and tie it behind the eyes. Oh that'll work Across raps. Then a little Zap-A-Gap here on the bead chain. There's a little bit the way and wrap a thread base back in preparation for the tails about over the barb. So I'm going to do is just pick a pair of the chickabou portion of this pelt, try to get them right next to each other so they're about the same size. Then I'm going to oppose the hackle, so if they're facing away from each other, like so that also gives you a little bit extra movement when you're fishing, this fly about hook length is fine, and I tie this in just like I were tying in, Oh, hackle point wings. Find your separation point, split it, bring your pinch wrap around and pull down, and that will collapse those feathers on top of the hook, shake and give you that split tail.
Sure, that's lined up to more rapid... We'll take off the rest of that as... Alright, for the weight, I'm going, do you use just a little bit of 0.25 lead wire, two purposes one, it on balances the fly, so that when you fish it, it flips and the bottom is down. Secondly, it helps me prepare this body before I use my over at to get everything nice and smooth, I'm just going to set that here, right in the eyes at firmly back to where I stop with the Hackle. And now our underbody is nice and smooth. Just peacock midge braid. Could use a number of things, but remember, the damsel flies are very, very narrow, very thin. So I wanted to keep with a thin material, like this gives it just a little bit of sparkle. I remember your damselflies emerge from the lake and swim to shore, so you should be positioning yourself on the bank and pulling the fly in towards the bank, and it's not a constant retrieve, it's a slow strip strip and a pause, and then a slow strip strip. You wanna keep this fly just underneath the surface to that off, then my strip of bug skin, so you can tie this in either way, I just find that if I tie it in or I bring the raw edge, the back edge up and apply a solarez as I get darker, wing case.
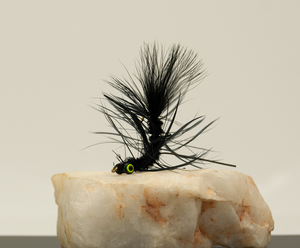
So that's what I'm going to do here. I'm going to cut some tips here into this, again, right behind the eyes, and I have the shiny side of this bug skin facing up about a third of the body for the wing case, and now I'm going to come to the Chickabou, soft hackle Pelt and pick out some soft hackle. First thing I need to do is the fold this hackle so that it lays... Well, I did a previous video on this, it's simply a matter of grabbing the tip and the base, applying some pressure, pitching with your fingers and rolling them down, pinch and down, I have the shiny side facing up, or you can fold the hackle either direction. Just start from the tip and work your way back like so, my division point here, which is where I'll tie in and leave just a little bit of a gap for the hackle starts that allows me to orient the hackle for a wrap it. You see, that first half wrap actually isn't hackle, that allows me to get that Quill oriented correctly. And as I wrap, sweep these hackle back and they just lay beautifully all the way up to where the thread is hanging and tie off, we just kind of roll this hackle down a little bit.
Bring our bug skin. Sorry, I'm bringing my thread forward, stretch this a little bit, make sure you got it centered in between the eyes... I make my first wrap a little soft, I try to minimize how much I Pucker at another three tight wraps, so as you see here, I have enough room to cut off and finish, and for that, I prefer just to use a blade of some sort. It's easier to cut it cleanly, try not to cut my thread... Okay, finish that off with a nice thread head and whip finish. As you can see, this is a fairly simple fly, I like to keep my flies simple, and I'm just going to use some solarez UV resin and apply it to this wing case, and it really darkens that's leather Up. Make sure you touch the abdomen back here, where your midge Braid is, this will help you keep this together, and I bring it right down to the thread wraps behind the eye, you can use the nozzle to push it around, I'm not really trying to build height here, I just want a little bit of... A little shine. I like that. Solarez recommends a two-part cure, particularly when you have thick, thick area like this one is just a flash cure, they recommend you hit just a second, you can see those...
Fluorescent is light up, this is a loud to heat to dissipate if you have a thick layer of this and you just hit it with a light and keep it on, what happens is underneath this material starts to warp and take on some funny shape, so they recommend a flash here, allow 15 seconds for the heat to dissipate and then cure it again, now this is their big light, which really puts out the Watts. Here you have it. Goggle Damsel, you go try. It's not a hard fly to tie. It's a great fly fish. Thanks for joining in and we'll see you next time.
- East Rosebud Fly and Tackle

Comments 0